How To Do Hip Thrusts: Methods, Benefits And Types
The hip thrust is a great bodyweight move for building strong glutes and a solid core. Also called the hip thruster, it’s great for improving posture and easing lower back pain.
To get the most out of it, nailing the form is key. Everything from foot placement and head position to range of motion matters. So, let’s look at how to do hip thrusts correctly to get their benefits:
How To Do The Hip Thrust: Step-By-Step Guide
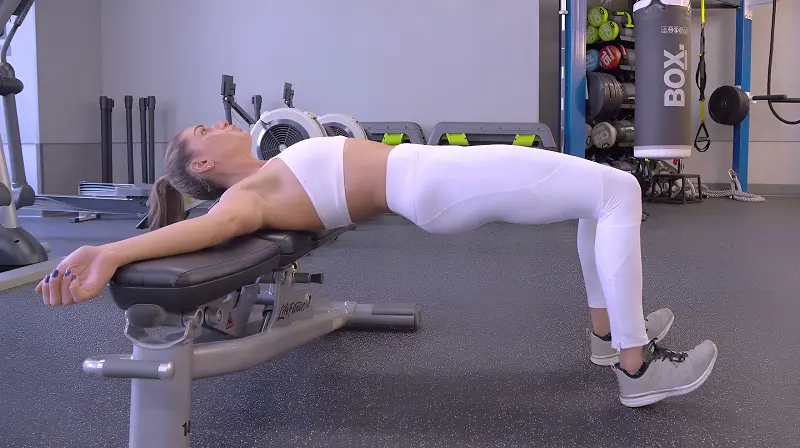
- Place your back against an elevated platform - a flat bench or box will work perfectly. Ensure that the platform’s height is not too high.
- Only the shoulders and upper back should rest on the bench / box.
- The knees must be bent while the feet will be flat on the floor.
- The feet will also need to be at shoulder width distance for stability. You may slightly turn the toes outward as well.
- Put the arms on the bench to maximize the hip thrust. They can also be placed on your chest. The arms should not be involved in the lifting process.
- Tuck your chin and press through the feet to lift the hip. Maintain a neutral spine and don’t overarch the back.
- Push the hips till they form a straight line with knees and back. Make sure the thighs are parallel to the floor at top of the movement.
- Once your hips are aligned, hold this straight-line position for a few seconds and squeeze the glutes at the top.
- Return back to the starting pose with slow, controlled momentum. Avoid dropping the hips too quickly, as it may lead to discomfort or muscle strain.
- Do not shift the position of the shoulders or legs throughout the movement. Doing so could decrease the exercise’s effectiveness.
- Repeat this process for 10 to 12 reps.
Benefits Of Hip Thrusts Exercise
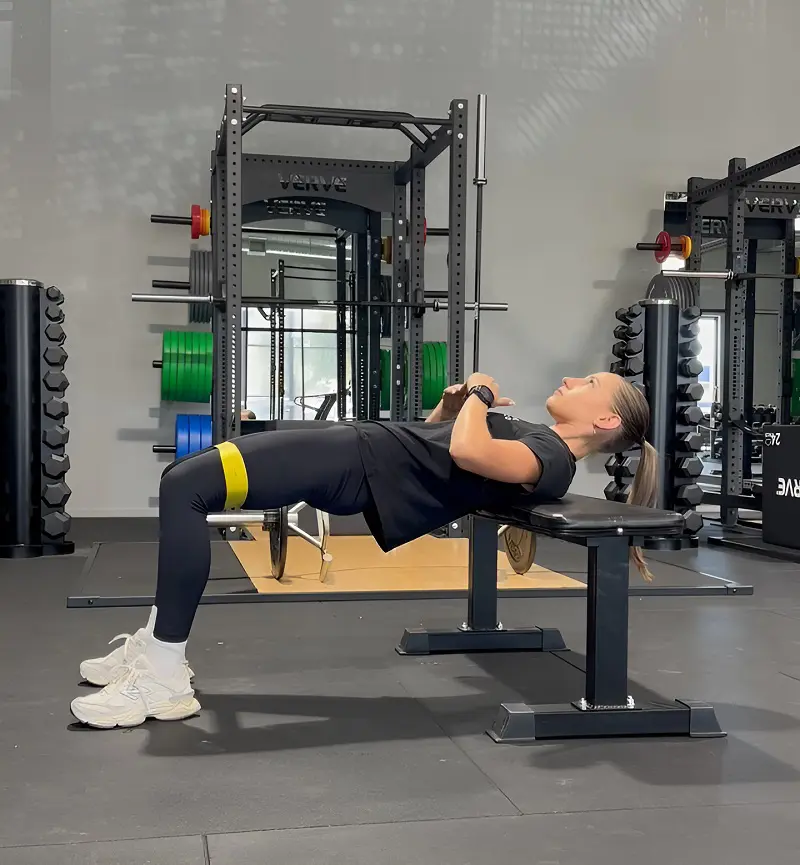
When done with proper form, this workout could become crucial in various fitness programs, especially those that target lower body muscles.
Here are some of the benefits of doing hip thrusts:
1. Increases Glute Strength
This benefit is a no-brainer when we talk about the hip thrusts. The hip thrusts directly promote the strengthening of the gluteal region through the lifting process and isometric hold at the top.
Having stronger glutes can be useful for various physical activities like running and jumping. Glute strength will become even more important for older people, as they face hip weakness due to wear and tear of the hip joint structure.
2. Enhances The Glute’s Size
Consistently doing the hip thrusts will ultimately build up the gluteal mass, making the hips appear rounded and lifted. This helps enhance the aesthetic appeal of individuals.
A person with well-toned butt will be considered physically attractive and this could be a big boost to their confidence.
3. Improves Core Stability
When we thrust the hips up, the core will be working constantly to hold tension and resist the lower back’s hyperextension. Doing this helps the core to stabilize the body and decrease unnecessary injuries.
Better core stability means that we’ll have an easier time doing other workouts and carrying out rigorous physical tasks in daily life.
4. Generates More Tension
If we’re looking to enhance the strength of our hip extensor muscles, hip thrust may actually be more effective than standard standing workouts like Romanian deadlifts, squats, and lunges. These moves feature lesser tension on the hip extensor.
Since the hip thrust is done in a horizontal position, it keeps maximum tension on the muscles through full range of motion. This helps build powerful extensor muscles quickly compared to other exercises, which is a big win for athletes who rely on speed.
5. Reduces Lower Back Pain
We may suffer from bad posture like the anterior pelvic tilt. This condition would place strain on our lower back, ultimately leading to severe pain. Practicing hip thrust aids to improve the pelvic alignment into its neutral position.
Sometimes, tight hip flexors may also be the issue for lower back pain. By strengthening the gluteal muscles, hip thrusts could counteract the hip flexors’ dominance. This offers stress relief for the lower back muscles and eases the pain.
Safety And Precautions
Safety is key when it comes to hip thrusts. Sloppy form or careless execution may lead to all sorts of problems - anything from minor muscle strains to serious lower back pain. That’s why we need to understand some solid tips before committing to multiple reps of this exercise.
Here are some safety tips that we should follow to make the hip thrust more safe and effective:
1. Maintain Correct Feet Placement
This may seem like a minor issue, but it could have a great impact on the leg muscles. When foot placement isn't done properly, we may end up compensating the glutes with other muscles - like the leg muscles.
For instance, when we put our feet very wide apart, the hip thrusts may emphasize hamstrings instead of the gluteal muscles. Placing them close to each other may put the focus on the quadriceps muscle.
2. Perform Full Extension
Try to get the hips fully extended when conducting the hip thrust workout. When we reach the top of the movement, the hips must be aligned with the back and knees. Not lifting them to the ideal place will reduce the effectiveness of the exercise.
However, we may not be getting the full extension due to problems like tight hip flexors or bad hip joints. In these cases, we should not force a full extension, as it will only worsen the injuries.
3. Lower The Hips Slowly
Although the lifting phase is essential for a successful hip thrust, the lowering phase is equally important. Some people may neglect the eccentric part of the exercise, but this phase continues to engage the glutes and make the core work harder.
Quickly lowering the hips imply that we’re missing out on a crucial part of the hip thrust workout. Moreover, rushing through the movement could lead to unnecessary hip injuries as well.
4. Position The Head Properly
During the hip thrust exercises, our head is not supported by the bench or box. So, it may be possible for a beginner to place their head back to make the hip lift easier. However, this action is actually counterproductive.
When we drop the head back and look up, it may lead to spinal curvature. This can be damaging to our lower back health. But if we crane our neck and face the head towards our chest, it will prevent this scenario through the maintenance of a neutral spine.
Variations Of Hip Thrust
1. Barbell Hip Thrust
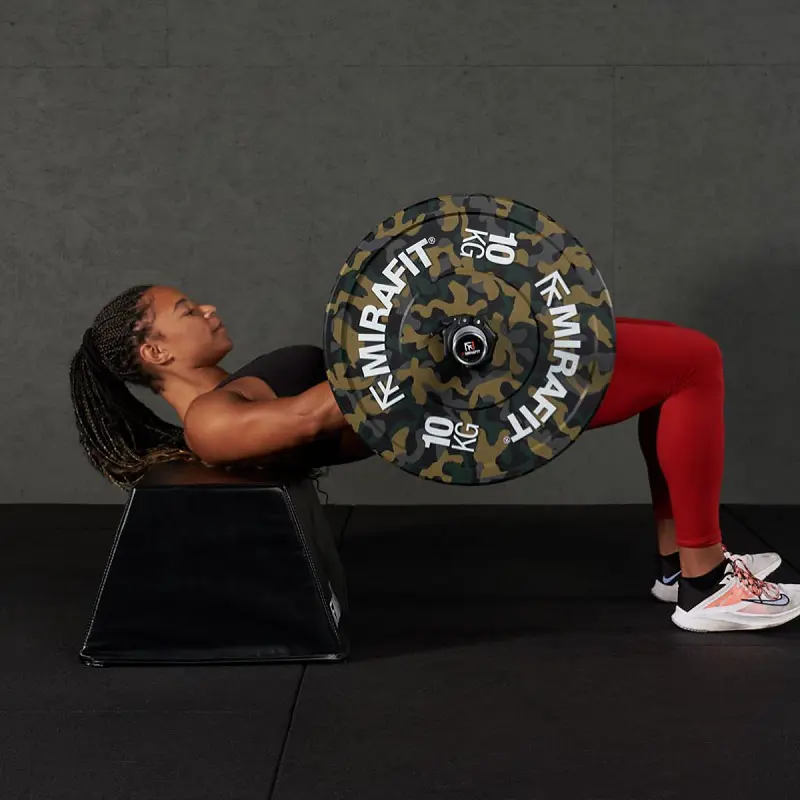
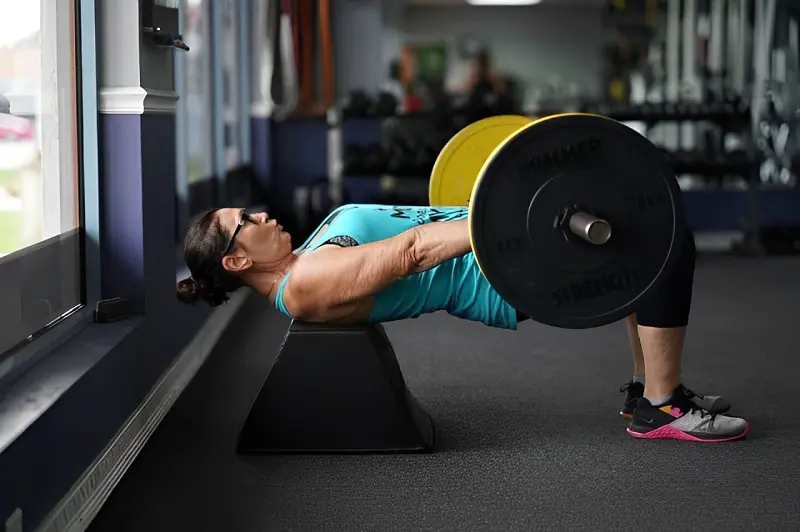
This variation is simple - we’ll need to add a barbell into the hip thrust. A barbell will increase the challenge but will also force the core and hips to work harder during the concentric phase.
Start the barbell variation with a lighter weight to avoid injuries. The heavier the barbell is, the more resistance we have to face during the workout.
Steps To Do:
- Place the shoulders and upper back on the flat bench. Crane your neck so that the head will face toward the chest.
- The knees must be bent while the feet should be firmly touching the ground.
- Now, put a barbell on top of your hips. You could get help from another partner to load the barbell.
- Grab the weight with both hands and engage the ab muscles.
- Slowly raise the hips, feeling the pressure from the barbell.
- When the hips align in a straight line with the back and knees, lower the hips down slowly.
- Continue practicing this exercise for 5 to 7 reps.
2. Single-Leg Hip Thrust
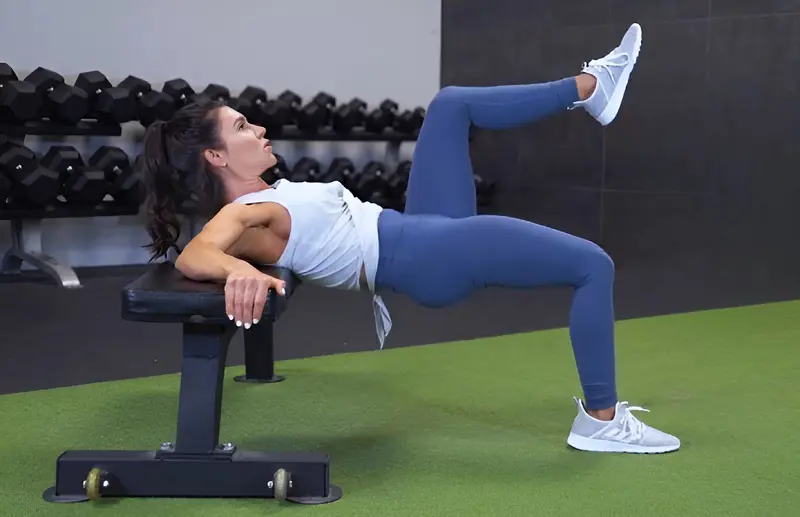
If we have mastered the classic hip thrusts, then we should try out this hip thrust variation. This is harder than the regular version, thanks to its added task of lifting one leg while raising our hips.
While doing this glute strengthening exercise, we need to ensure that the leg doesn’t get lifted too high, as it could cause overstretching of the gluteal muscles.
Steps To Do:
- With the delts and upper back resting on the bench, look toward the chest.
- Keep the back straight while the knees must be bent. The feet should be placed hip width apart.
- Raise the right leg off the floor and bend it at 45-degree angle.
- Maintaining this position, start lifting the hips slowly and steadily. Press through the left heels to push the body upwards.
- When the hips, thighs, and back become parallel to the floor, hold the pose for some seconds.
- Lower the hips down without overarching the spine. Keep the right leg lifted during the eccentric phase too.
- Perform this workout for desired number of reps.
3. Dumbbell Hip Thrust
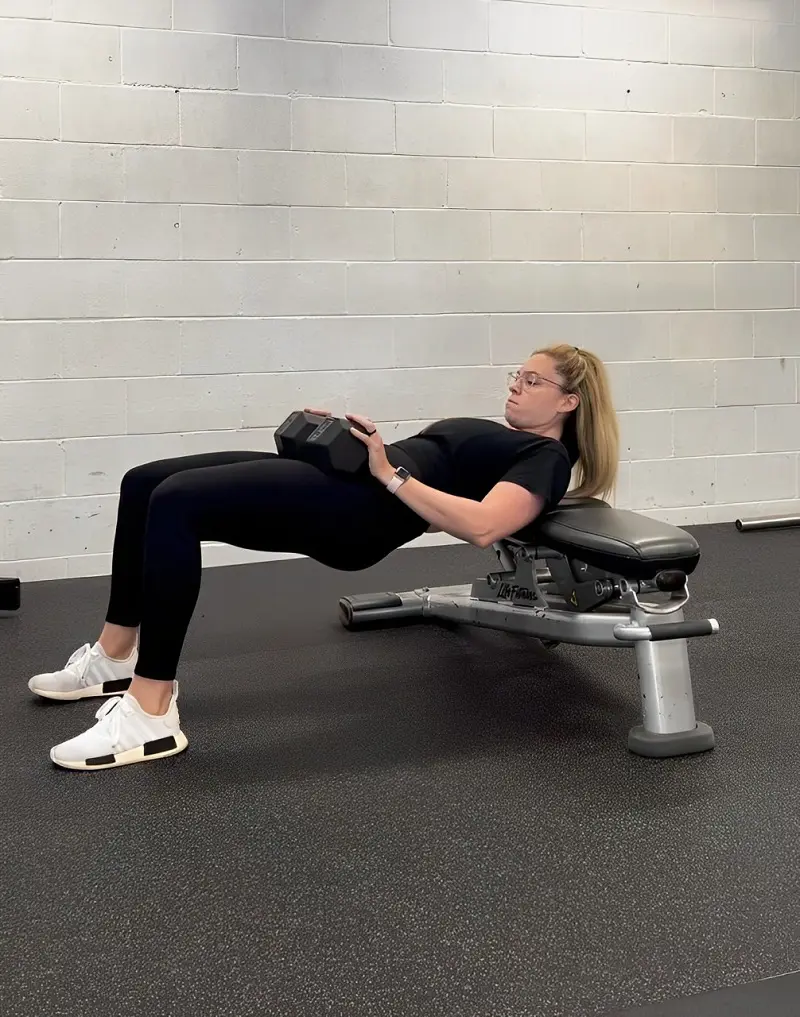
Dumbbells are a great alternative for people who believe barbells are too heavy. Doing the hip thrust with a dumbbell offers the same advantages as the bodyweight version. However, it could offer more muscle engagement due to the added resistance.
Steps To Do:
- Put a dumbbell on top of your hips and lie down on the bench, just like barbell hip thrust.
- Grab each end of the weight to ensure they are stable and don’t fall off easily.
- Engage the core muscles, press through heels, and lift the hips toward the ceiling.
- Squeeze the glutes at top and hold the pose for a few seconds.
- Return to the starting position, keeping the weight in center.
- Practice the dumbbell hip thrusts for 10 to 12 reps.
4. Elevated Hip Thrusts
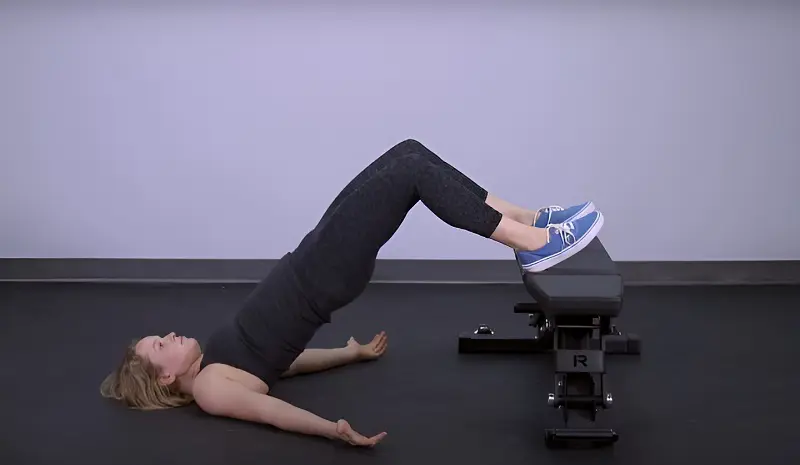
What if we reverse the body positions of the regular hip thrust? By putting the feet on the bench and upper body on the ground, we have effectively created a new variation. This workout features an enhanced range of motion compared to the standard version.
Steps To Do:
- Start by placing your feet on the bench, pointing your toes upward so the heels support your lower body.
- Place both arms by your sides. This will help to create stability during the lifting phase.
- Make sure the hips, back, and shoulders stay in contact with the ground.
- Now, lift the hips with slow, controlled momentum. Press through the palms and heels to successfully do it.
- Tuck your chin when the hips get raised. The back must remain straight throughout the movement.
- Hold at the top for a few seconds and then, bring the hips back to their original position.
- Repeat this activity for desired number of reps.
Hip Thrusts Alternatives
1. Glute Bridge
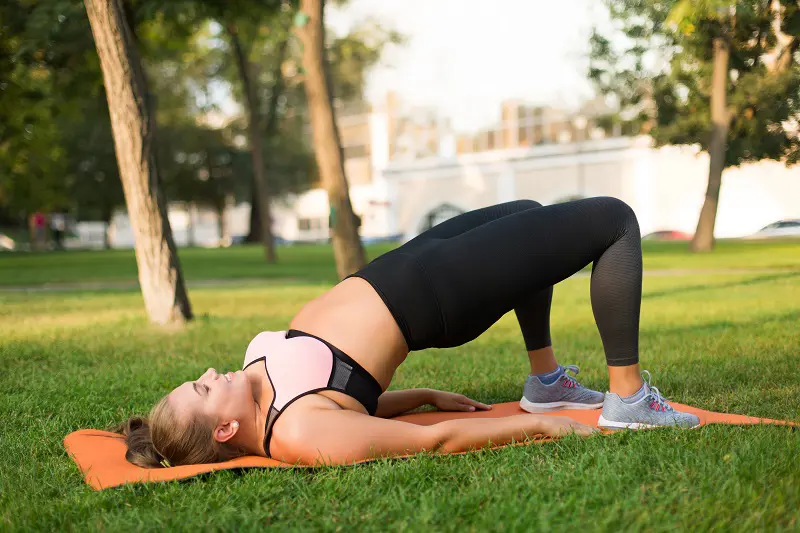
Glute bridge is a great alternative that we should try if we’re looking to strengthen our glutes and core muscles. The major difference between the two is their setup - the glute bridge starts from the ground, while the hip thrusts have us positioned on a bench.
As a beginner, we’ll probably find glute bridges more friendly compared to the hip thrusts. However, the hip thruster still features a greater range of motion, which could be helpful for faster muscle growth.
Steps To Do:
- Lie down on the ground in a supinated position. Bend at the knees and bring both feet closer to hips.
- Put the arms by your sides, palms facing the ground. Maintain a straight back and relaxed shoulders.
- Next, press through the palms and feet to raise the hips off the floor.
- Once the hips, knees, and back align in a straight line, stop the lifting phase.
- Squeeze the glutes at top and stay there for 30 seconds.
- Slowly lower back down to initial position, feeling a good stretch in the glutes.
- Conduct this exercise for 10 to 12 reps.
2. Romanian Deadlift
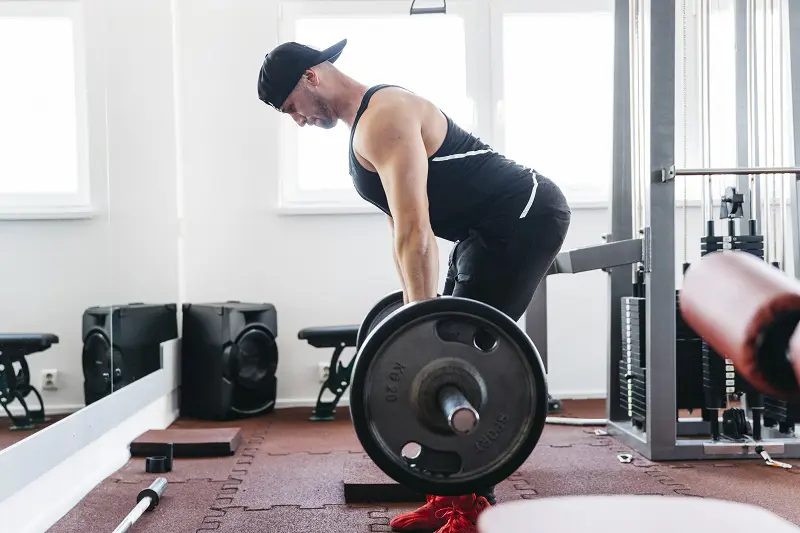
Romanian deadlift also targets the glutes but shifts more of the load onto the lower back and hamstrings. This deadlift is a fantastic move for anyone wanting to target entire posterior chain in one go. While it's usually done with a barbell, dumbbells or kettlebells work fine too.
Steps To Do:
- Stand tall while carrying a barbell in front of you. The barbell should be positioned at your hip level.
- The feet should be hip width apart. The toes must be pointed forward.
- Take a deep breath, engage the core, and push the hips backward. This makes you lean forward.
- Keep a straight back as you lower the body. The barbell should also glide down.
- Once the weight reaches the shins, slowly push yourself back up to standing position.
- Continue doing the activity for desired number of reps.
3. Single-Leg Glute Bridge
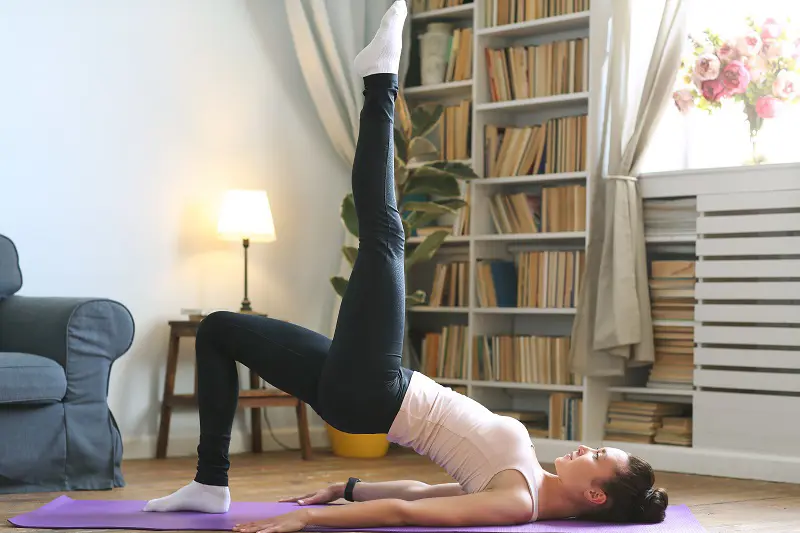
A single-leg version of the glute bridge is present too, and it offers unilateral training. Some people may have a stronger left glute compared to the right. In this case, single-leg glute bridges help reduce this imbalance. It's performed by lying on the ground, which differentiates it from hip thrusts.
Steps To Do:
- Start by lying down on the floor with the right leg extended and the left one bent. The arms should be by your sides.
- Raise the hips toward the ceiling without arching the back. Press through the palms and left foot to drive the hips up.
- While lifting the hips, you need to raise the right leg as well. You could slightly bend the knee.
- Once the hips become aligned with the back, stay in this pose for a few seconds.
- Return back to the starting position and then, switch sides.
- Perform this exercise for 5 to 7 reps.
4. Good Morning
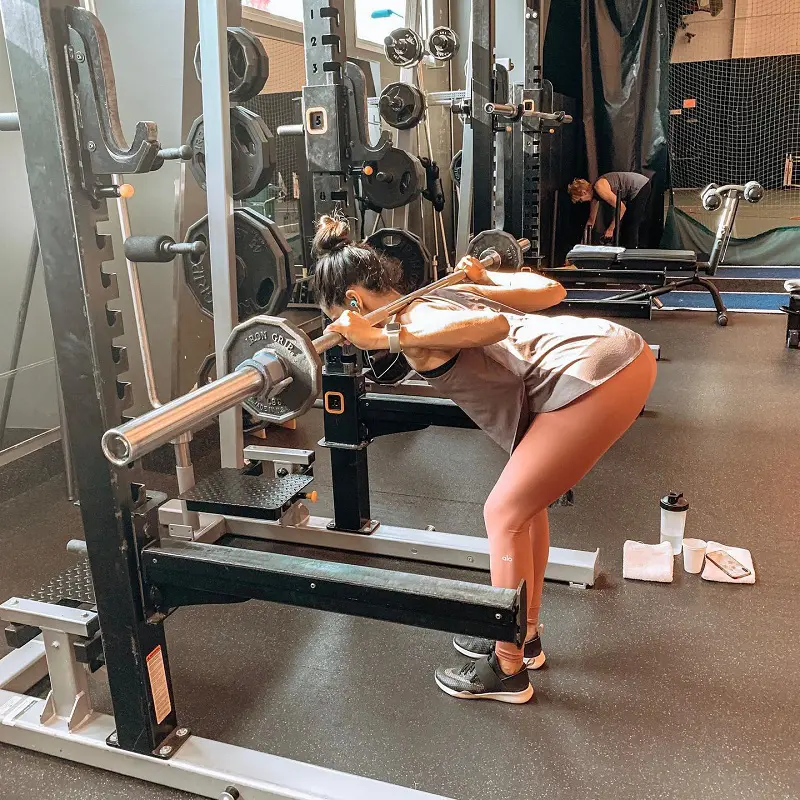
This alternative focuses on hinging the hips instead of bridging. It is especially useful for those who are looking to enhance their posterior chain without relying on a bench or weights pressing down the hips.
Steps To Do:
- Get under a barbell on a squat rack and unrack it by placing it on your shoulders. The feet should be at hip width distance.
- Stand with an erect back and engage the ab muscles.
- Now, hinge at the hips without shifting the barbell’s position. The upper body will lean forward.
- Lower the body till the chest becomes parallel to the floor.
- Push your hips forward and get back to the standing pose.
- Conduct this workout for 10 reps.
Recent posts
How To
How To
How To Do Bird Dog Exercise? Techniques, Types And Benefits
If we want to enhance core strength and spinal stability, Bird Dog is a fantastic bodyweight exercise to include in any workout routine. It activates various muscle groups like abdominals, glutes, and erector spinae. The movement itself isn’t t...
How To
How To Do Bicep Curls And Develop Stronger Arms
Bicep curl may be the first weight-training exercise we’ll learn during our fitness journey. Sure, it’s about moving a dumbbell up and down, but there’s more to it - it’s a solid strength builder and a great method to define t...
How To
How To Do Lat Pulldown? Methods, Benefits And Types
Doing a lat pulldown is not hard - it's all about maintaining proper momentum and pulling the bar toward our upper chest. This popular exercise is fantastic for engaging our back muscles, particularly the latissimus dorsi. Getting the form right is k...
How To
A Proper Guide On How To Do The Splits For Beginners
Learning how to do the splits is the ultimate goal for every gymnast and fitness enthusiast. Spreading the legs to a 180-degree angle is a true testament to athletic power and flexibility. As a beginner, it might feel intimidating at first, but with ...
How To
A Guide On How To Measure Your Waist Correctly
Measuring an individual’s waist is crucial for assessing internal fat deposits that surround the heart. It can indicate a person’s current health status, with a larger waistline suggesting a higher risk of heart disease and stroke. Along ...
How To
Hip Dips: What Are They And How To Get Rid Of?
Hip dips are slight indentations on the outer hips, appearing as small inward curves when viewed from the front. They are usually due to the protrusion in the pelvic structure and are largely determined by genetics. Many women aim for a more rounded ...
